Showing posts with label python. Show all posts

How to use the OpenAPI code generator with your OpenAPI specification for your REST API implementation

In this post, we will introduce what is the OpenAPI code generator, and what it does in the context of the REST API and OpenAPI specification. Although I had a clear understanding of the REST API and why we need follow OpenAPI specification, it was not so clear at the beginning when it comes to the OpenAPI code generator and what it generates, and how it helps. If you have the same confusion, you are in the right place.

The content is as follows:
  • Background
  • Install OpenAPI code generator
  • Prepare OpenAPI specification - YAML/JSON file
  • Generate server stub using the OpenAPI code generator
  • Implement your functionality on top of the generated server sub

Background

Before delving into OpenAPI code generator, let's first talk about some background of the OpenAPI specification first. 

It comes from the API-first design or top-down API development where we specify API specifications first using formats such as OpenAPI specification, then implement the actual code. In contrast, the other option -  code-first designs or bottom-up approach - implements the actual code and then generates API specifications from that.

So we are talking about the API-first design, which has following workflows:
OpenAPI specification document (JSON/YAML file) => OpenAPI code generator => Client/Server stubs (skeletons) => Implement your business logic code to complete the stubs

According to the Swagger website, the OpenAPI Specification (OAS) defines a standard, language-agnostic interface to HTTP APIs which allows both humans and computers to discover and understand the capabilities of the service without access to source code, documentation, or through network traffic inspection. When properly defined, a consumer can understand and interact with the remote service with a minimal amount of implementation logic. 


Prepare OpenAPI specification - YAML/JSON file


An OpenAPI document that conforms to the OpenAPI Specification is itself a JSON object, which may be represented either in JSON or YAML format. You can use online tools such as Swagger editor to design and define your specification.

We use an example OpenAPI specification (an YAML file - openapi.yaml) from an awesome example. For detailed explanation regarding the specification, one can look at the example page.


openapi: 4.0.2
info:
  title: Sample OpenAPI Specification
  description: 'An OpenAPI specification example for Building API services: A Beginners Guide document.'
  version: 0.0.1
servers:
  - url: http://localhost:9000/
    description: Example API Service
components:
  schemas:
    'User':
      type: object
      required:
        - display_name
        - email
      properties:
        name:
          type: string
          readOnly: true
        display_name:
          type: string
          maxLength: 20
          minLength: 1
        email:
          type: string
          format: email
    'ErrorMessage':
      type: object
      required:
        - error_code
        - error_message
      properties:
        error_code:
          type: string
        error_message:
          type: string
paths:
  /users/{user_id}:
    parameters:
      - name: user_id
        in: path
        description: ID of a user
        required: true
        schema:
          type: string
    get:
      description: Gets a user
      operationId: get_user
      responses:
        '200':
          description: User found
          content:
            'application/json':
              schema:
                $ref: '#/components/schemas/User'
        'default':
          description: Unexpected error
          content:
            'application/json':
              schema:
                $ref: '#/components/schemas/ErrorMessage'

Install OpenAPI code generator

First, we need to get our OpenAPI code generator ready. We can follow the install OpenAPI code generator instruction from its official site, I used "Bash Launcher Script" for my installation on Ubuntu22.04. 

We can test if after installation:

$openapi-generator-cli version
7.2.0


Generate server stub using the OpenAPI code generator

Once we have an OpenAPI specification for your API design and the OpenAPI code generator ready, we can use the tool to generate clent SDK or server stubs in a lot of different programming languages. A complete list of generators provided by the tool can be found here.

Here we want to generate server stubs with the python-flask generator of the tool, which will help us generate server stubs according to the openapi.yaml file we have prepared.
 

openapi-generator-cli generate -i openapi.yaml -o generated -g python-flask
-i: the input file
-o: destination folder to generate all files
-g: specify generator - python-flask


Under the generated folder, we can see the following folder structure with all folders and files generated automatically.

Dockerfile  
git_push.sh  
/openapi_server 
    /controllers
    /models
    /test
    /openapi
    encoder.py  
    __init__.py  
    __main__.py  
    __pycache__    
    typing_utils.py  
    util.py
README.md  
requirements.txt  
setup.py  
test-requirements.txt  
tox.ini
The README.md file contains instructions about how to set up the API server. The model folder contains the model - user resource - of the API defined, and the controllers folder contains files related to API logic. 

Here we use Python version: 3.9.18 environment, and follow the README.md instruction. The first step is installing required packages specified in the requirements.txt.

pip3 install -r requirements.txt
But I found some parts need to be updated. For example, in the requirements.txt, we need to update the installation of connextion including the flask for the first line as the old Flask in the last line doesn't work for the new Python version.

  1 connexion[swagger-ui] >= 2.6.0; python_version>="3.6"
  2 # 2.3 is the last version that supports python 3.4-3.5
  3 connexion[swagger-ui] <= 2.3.0; python_version=="3.5" or python_version=="3.4"
  4 # connexion requires werkzeug but connexion < 2.4.0 does not install werkzeug
  5 # we must peg werkzeug versions below to fix connexion
  6 # https://github.com/zalando/connexion/pull/1044
  7 werkzeug == 0.16.1; python_version=="3.5" or python_version=="3.4"
  8 swagger-ui-bundle >= 0.0.2
  9 python_dateutil >= 2.6.0
 10 setuptools >= 21.0.0
 11 Flask == 2.1.1


  1 connexion[swagger-ui,flask] >= 2.6.0; python_version>="3.6"
  2 # 2.3 is the last version that supports python 3.4-3.5
  3 connexion[swagger-ui] <= 2.3.0; python_version=="3.5" or python_version=="3.4"
  4 # connexion requires werkzeug but connexion < 2.4.0 does not install werkzeug
  5 # we must peg werkzeug versions below to fix connexion
  6 # https://github.com/zalando/connexion/pull/1044
  7 werkzeug == 0.16.1; python_version=="3.5" or python_version=="3.4"
  8 swagger-ui-bundle >= 0.0.2
  9 python_dateutil >= 2.6.0
 10 setuptools >= 21.0.0

Also, the encoder.py file needs to be updated using JSONEncoder from the json package instead of FlaskJSONEncoder as it was automatically generated.

from json import JSONEncoder
from openapi_server.models.base_model import Model


class JSONEncoder(JSONEncoder):
    include_nulls = False

    def default(self, o): 
        if isinstance(o, Model):
            dikt = {}
            for attr in o.openapi_types:
                value = getattr(o, attr)
                if value is None and not self.include_nulls:
                    continue
                attr = o.attribute_map[attr]
                dikt[attr] = value
            return dikt
        return JSONEncoder.default(self, o)

There is seprate port issue reported on GitHub about the port specified in the OpenAPI specification is not reflected in the generated code. For example, the server still start at 8080 no matter which port you have specified in the OpenAPI specification (YAML/JSON file).

Once we've done the setting up of the required packages, we can start the API server according to the README.md file.


python3 -m openapi_server


We can now access the UI http://127.0.0.1:8080/ui/ for an UI provided from Swagger about your REST API based on the specification.
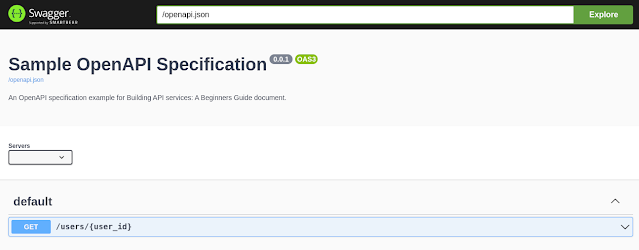


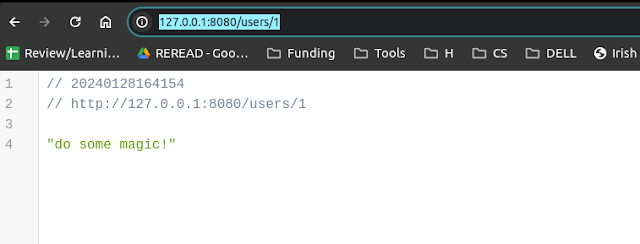
If we test it the API out using our path specified in our openapi.yaml, we can see the current autogenrated stub provides some dummy responses, and this part needs to be completed by us with our actual code and logic.


Implement your functionality on top of the generated server sub

As we mentioned ealier, you can find the default_controller.py file which shows your actual code and implemetation of your logic need to go based on the current stub that has been autogamically generated by the OpenAPI code generator.


def get_user(user_id):  # noqa: E501
    """get_user

    Gets a user # noqa: E501

    :param user_id: ID of a user
    :type user_id: str

    :rtype: Union[User, Tuple[User, int], Tuple[User, int, Dict[str, str]]
    """
    return 'do some magic!'

One thing to note is that the rtype (return type) is also very confusing here. It says Union or Tuple type but after many trials and errors, it turns out to be a JSON object - e.g., using json.dumps() - to be returned in order to work!

I hope you enjoyed the post and it is helpful for your REST API development journey!

403 Forbidden errors when request a webpage using Python requests

Error 

403 Forbidden errors when request a web page using Python requests. 


Cause

Usually, this is caused by the lack of headers indicating User-Agent. We can add the header information with User-Agent and send the request again.

import requests

url = 'http://example.com/'

headers = {'User-Agent': 'Mozilla/5.0 (Macintosh; Intel Mac OS X 10_11_5) AppleWebKit/537.36 (KHTML, like Gecko) Chrome/50.0.2661.102 Safari/537.36'}

result = requests.get(url, headers=headers)
# Check the status code 
print(result.status_code)

How to let pip ignore incorrect cached packages

When installing required packages with pip, sometimes it uses cached packages, e.g., older versions of those packages which can cause compatibility issues.

One way to deal with it is deleting the cache directory for pip.

$ sudo rm -rf ~/.cache/pip

Then we can redo the pip install, for instance using a requirement.txt file

$ pip install -r requirements.txt


With pip 20.1 or later, you can find the full path for your operating system easily by typing this in the command line:

$ pip cache remove matplotlib: removes all wheel files related to matplotlib from pip's cache.

$ pip cache purge: to clear all wheel files from pip's cache.

$ pip cache dir: to get the location of the cache.


If you want to not use the pip cache for some reason (which is a bad idea, according the official docs), your options are:

$ pip install --no-cache-dir <package>: install a package without using the cache, for just this run.

$ pip config set global.no-cache-dir false: configure pip to not use the cache "globally" (in all commands).


Tensorflow Probability: module 'collections' has no attribute 'Sequence'

  File "/Users/judau/miniconda/lib/python3.10/site-packages/tensorflow_probability/python/layers/distribution_layer.py", line 171, in _fn

    value_is_seq = isinstance(d.dtype, collections.Sequence)

AttributeError: Exception encountered when calling layer "multivariate_normal_tri_l" (type MultivariateNormalTriL).

module 'collections' has no attribute 'Sequence' 

################################################

The issue seems related to the `collections.abc` package which has been available since Python 3.3, and `collections.Mapping` and `collections.Sequence` are gone as of Python 3.10. So if you are using Python 3.10+, it might cause this type of error as discussed in the following thread.

https://github.com/tensorflow/probability/commit/76ff71ba27a5a035fa6220e6132744ac89a56fdf#

Move uses of collections.Mapping and collections.Sequence to `col…
…lections.abc`.

The `collections.abc` package has been available since Python 3.3, and `collections.Mapping` and `collections.Sequence` are gone as of Python 3.10.

TypeError: Descriptors cannot not be created directly.

TypeError: Descriptors cannot not be created directly.

If this call came from a _pb2.py file, your generated code is out of date and must be regenerated with protoc >= 3.19.0.

If you cannot immediately regenerate your protos, some other possible workarounds are:

 1. Downgrade the protobuf package to 3.20.x or lower.

 2. Set PROTOCOL_BUFFERS_PYTHON_IMPLEMENTATION=python (but this will use pure-Python parsing and will be much slower).  

####################################################


As suggested by the error message itself, we just need to downgrade the protobuf package to 3.20.x or lower.

$ pip install protobuf==3.20.*

How to decide the sample size of A/B testing using Python?

Deciding the sample size for running A/B testing is an essential step. In this post, we take an example from the Udecity course - Overview of A/B Testing. 

We are interested in changing the color of "Start Now" button on an Udecity-like website to see the effect of click-through probability, which is measured by 

# of users clicked / # of users visited

Based on 1000 users visited, we found that 100 users clicked. This gives us 10% of the click-through probability. We are also interested in 
  • significant level (usually referred as $\alpha$) of 5% (0.05)
  • practical significance level of 2%, i.e., minimum effect that we care about
  • power/sensitivity of 80% (fairly standard)

First, we use an online calculator that has been introduced in the course: https://www.evanmiller.org/ab-testing/sample-size.html. The terminologies used by this calculator and the corresponding ones that we mentioned above are:
  • base conversion rate: click-through probability. This is estimated click-through probability before making the change
  • minimum detectable effect: practical significance level, and we care about absolute difference.
  • statistical power: power/sensitivity
  • significant level: significant level
And the result of the calculator is 3,623.


Here we use the same equation in Python to derive the same result mentioned above.


## Calculate required sample size
def calc_sample_size(alpha, power, p, pct_mde, absolute=True):
    """ Based on https://www.evanmiller.org/ab-testing/sample-size.html

    Args:
        alpha (float): How often are you willing to accept a Type I error (false positive)?
        power (float): How often do you want to correctly detect a true positive (1-beta)?
        p (float): Base conversion rate
        pct_mde (float): Minimum detectable effect, relative to base conversion rate.

    """
    if absolute:
        delta = pct_mde
    else:
        delta = p*pct_mde
    t_alpha2 = norm.ppf(1.0-alpha/2)
    t_beta = norm.ppf(power)

    sd1 = np.sqrt(2 * p * (1.0 - p))
    sd2 = np.sqrt(p * (1.0 - p) + (p + delta) * (1.0 - p - delta))

    return int(np.ceil((t_alpha2 * sd1 + t_beta * sd2) * (t_alpha2 * sd1 + t_beta * sd2) / (delta * delta)))

print(calc_sample_size(alpha=0.05, power=0.8, p=0.1, pct_mde=0.02))

Output:
3623
As we can see, the Python method produces the same result as the online calculator. 

String and Characters


In Python, a string is a sequence of characters, and both string and character are considered the same. Python does not have a data type with respect to characters. Therefore, we can use a single-character string for characters.

A string is a sequence of characters and can include text and numbers. String values must be enclosed in matching single quotes 'I am a string' or double quotes "I am also a string".
  
 	a = 'I am a string'
  	b = "I am also a string"


Encoding

As computers only recognize binary codes (i.e., a sequence of 0/1s), a character must be converted into binary numbers in a computer. Mapping a character to its binary representation is called character encoding. 

There are different ways to encode a character such as ASCII (American Standard Code for Information Interchange) and Unicode. ASCII encodes 128 specified characters into seven-bit integers which you can find from the ASCII chart. Unicode is an encoding scheme for representing international characters. A Unicode starts with \u, followed by four hexadecimal digits that run from \u0000 to \uFFFF. 

As Python supports Unicode and you can try to print some Unicode characters.
  
  >>> print(u'\u6B22\u8FCE')
  欢迎


  >>> print(u'\u011f')
  ÄŸ
  
  
Python's ord() function takes the string argument of a single Unicode character and return its integer Unicode code decimal value.
  
  >>> ord('ÄŸ')
  287


Concatenation

You can concatenate two strings in Python simply using +, e.g., "welcome" + " to my blog".

  >>> a = 'welcome' + ' to my blog'
  >>> print(a)
  welcome to my blog


Why do we need both single and double quotes

You can concatenate two strings in Python simply using +, e.g., "welcome" + " to my blog".

>>> print('Alice says 'hello' to Bob')
  File stdin, line 1
    print('Alice says 'hello' to Bob')
                       ^
SyntaxError: invalid syntax
  
So we can use different quotes to achieve what we want.

  >>> print('Alice says "hello" to Bob')
  Alice says "hello" to Bob
  >>> print("Alice says 'hello' to Bob")
  Alice says 'hello' to Bob
  
In case you really want to stick to one quote, either single or double, you need to use add \ (backslash) to espcape

  >>> print("Alice says \"hello\" to Bob")
  Alice says "hello" to Bob
  
Some other special characters such as 
\' or \" include 
  • \' => ' 
  • \" => " 
  • \n => treated as newline 
  • \t => treated as tab
Although \n provides a way to change to new line, it is not so convinient for long text. 

>>> print('this is first line\nthis is second line\nthis is third line')
this is first line
this is second line
this is third line
Thanksfully, Python provides another special method to input long text

>>> print('''this is first line
... this is second line
... this is third line''')
this is first line
this is second line
this is third line

Tensorflow Error - TypeError: bases must be types


It worked just fine for me. Tensorflow and protobuf versions are incompatible in my case.

pip uninstall protobuf
pip install protobuf==3.20.1
Source: https://stackoverflow.com/questions/72779449/google-visions-python-client-quickstart-throws-typeerror-bases-must-be-types

TypeError: Cannot cast ufunc multiply output from dtype('float64') to dtype('int16') with casting rule 'same_kind'


import numpy

A = numpy.array([1, 2, 3, 4], dtype=numpy.int16)
B = numpy.array([0.5, 2.1, 3, 4], dtype=numpy.float64)

A *= B

Solution:

Replace A *= B with A = A * B or numpy.multiply(A, B, out=A, casting='unsafe')

Jupyter notebook download as pdf: nbconvert failed: Pandoc wasn't found. nbconvert failed: No suitable chromium executable found on the system. Please use '--allow-chromium-download' to allow downloading one.


Install Pandoc

After that you need to have XeTex installed on your machine:
  • Linux : TeX Live
  • Mac : MacTex
  • Windows : MikTex

Install nbconvert and pyppeteer

pip install nbconvert
pip install pyppeteer

Now we can convert an ipynb file to to PDF via HTML or via Tex.

jupyter nbconvert --to webpdf --allow-chromium-download filename.ipynb
or 


jupyter nbconvert --to pdf filename.ipynb

filename.ipynb is the filename of your file to be converted to a PDF file.

How to plot two histograms side by side in a single plot?


import matplotlib.pyplot as plt

x = np.random.randint(low=1, high=100, size=1000)
y = np.random.randint(low=10, high=110, size=1000)

plt.hist([x,y], bins=10, label=['x','y'])
plt.legend()
plt.show()


What are those underscores in a number in Python?


For example, we can see many examples where underscores appearing in a number in Python such as


a = 1_000_000

Explanation 

In English speaking countries, commas are generally used as thousand separators, while in many other countries, periods are used as thousand separators. Given the differing conventions, and the fact that both commas and periods are used for other things in Python, it was decided to use underscores as separators [1]. 

Python allows you to put underscores in numbers for convenience. They're used to separate groups of numbers, much like commas do in non-programming (e.g., 1,000,000). Underscores are completely ignored in numbers, much like comments [1]. So this:

a = 1_000_000
print(a)

Output:

1000000

References 
[1]. https://stackoverflow.com/questions/54009778/what-do-underscores-in-a-number-mean

How to know the scope of variables in Python?

 In this post, we go through the default scope of variable, and the scopes of variables with the global and nonlocal statement in front of a variable.

Let's go through an example from Python documentation website below, and see the output of this piece of code.


Output:

  1. After local assignment: test spam
  2. After nonlocal assignment: nonlocal spam
  3. After global assignment: nonlocal spam
  4. In global scope: global spam

Explanation:
  1. The spam assigned inside do_local() is a local variable (default). As mentioned in the website: "The local namespace for a function is created when the function is called, and deleted when the function returns or raises an exception that is not handled within the function. (Actually, forgetting would be a better way to describe what actually happens.) Of course, recursive invocations each have their own local namespace.". Therefore, the spam in the green square scope is unchanged (i.e., as initialized - "test spam")
  2. The nonlocal statement causes the listed identifiers to refer to previously bound variables in the nearest enclosing scope excluding globals. That is, the spam in the green square scope is updated to "nonlocal spam" after calling do_nonlocal().
  3. The global assignment changed the module-level binding in the global scope (blue square scope), so the spam called "After global assignment" is still the one in the green square scope - nonlocal spam.
  4. Finally, if we print("In global scope", spam) where we are printing spam in the global scope, the one in the blue square scope will be printed, which is "global spam".

How to use extend() method of List in Python?

 The extend() method adds all the elements of an iterable (list, tuple, string etc.) to the end of the list.

For example, the following code extends list1 with iterable - list2/set2.

list1 = [1, 2, 3]
list2 = [4, 5]

list1.extend(list2)
print(list1)

# Output
[1,2,3,4,5]

list1 = [1, 2, 3]
set2 = (4, 5)

list1.extend(set2)
print(list1)

# Output
[1,2,3,4,5]
This is the same behavior as += for list if you have been using it.

list1 = [1, 2, 3]
list2 = [4, 5]

list1 += list2
print(list1)

# Output
[1,2,3,4,5]
Compared to append(), extend() adds all elements of an iterable as separate elements to the list while append() simply appends iterable as an element.

list1 = [1, 2, 3]
list2 = [4, 5]

list1.append(list2)
print(list1)

# Output
[1, 2, 3, [4, 5]]

Pip install Read timed out error

Error: pip._vendor.urllib3.exceptions.ReadTimeoutError: HTTPSConnectionPool(host='files.pythonhosted.org', port=443): Read timed out 

Reasons:

  • the network speed is slow, which caused by instability
  • the default installation source for some libraries is pip the default source is pypi.python.org, if the server that installs the source is not in the country, it will be restricted

Solutions:(https://www.codestudyblog.com/cs2112pyb/1214135027.html)

1 change settings pip installation extension time
  • pip --default-timeout=100 install -U  library name 

2 change the mirror image

replace the use of domestic images during pip installation , general use of tsinghua university 、 these two images of douban

tsinghua mirror image :

pip install -i https://pypi.tuna.tsinghua.edu.cn/simple  library name 
douban image :

pip install -i http://pypi.douban.com/simple  library name 
  domestic commonly used mirror images


3 set up proxy

pip installation by setting up an agent

pip install --proxy  proxy library name 

for example :
pip install -i http://pypi.douban.com/simple  --proxy http://10.22.96.13:8008 jupyter


4 modify pip change the source of the configuration file

by modifying the pip configuration , to change the default source to a domestic one, we only need the simplest command. "pip config set global.index-url source link " that's it. for example, replace it with tsinghua source. :

pip config set global.index-url https://pypi.tuna.tsinghua.edu.cn/simple/

How to check docstring or method details of a method in Jupyter notebook?

When using a method in Jupyter notebook, it always comes convinient by checking docstring or method details of a method, e.g., what parameters the method have. Here we have two options to check those.

The first option is add "?" at the end of the method you would like to check and run the cell, which will give you the method details in a printed format.


The second option is using the combination of "shift+tab" keys with the mouse cursor inside the method bracket, which will show you method details in a format below.


What is GitHub Copilot and how it works?

What is GitHub Copilot?

GitHub Copilot might be one of the most intersting AI use case from Microsoft GitHub in 2021. In this post, we look into an overview of what is GitHub Copilot and how it works with some examples.


GitHub Copilot is an artificial intelligence tool developed by GitHub and OpenAI to assist users of Visual Studio Code, Neovim, and JetBrains by autocompleting code. It was first announced by GitHub on 29 June 2021.


If you visit the GitHub Copilot official website, you will see the brief summary of Copilot as "Your AI pair programmer", and with GitHub Copilot, get suggestions for whole lines or entire functions right inside your editor.


How it works?

So based on the above description, we get an idea about what is Copilot - your pair programmer which can provide quick suggestions for completing your code (e.g., entire functions) in your editor so that you can complete your code without actually typing the content of a function for example.


To test with some examples, I applied GitHub Copilot Technical Preview and got approved, and used the following environments for the testing:


First example: Binary Search

The following video shows how we can complete binary_search function with the help of Copilot where its suggested code will be shown in gray color, and if you like the suggestion, you can use [Tab] key to accept the suggested code for your usage instead of coding from scratch - which is super awesome!


First, when I try def binary_search(, the Copilot will suggest two input parameters (i.e., arr and target) for my function based on the function name that I typed.

Secondly, when I move to the body of the function to write, as we can see from the video, Copilot will automatically suggest the entire binary search example code for us to use if we satisfied with the suggested code - which is working without any problem like a charm!


Second example: Bubble, Selection and Insertion Sort

Next, we try three basic sorting algorithm implementations with the help of Copilot in the following video. Based on the function name itself, the Copilot can automatically suggest relevant code snippet for the function when I change the function name from "bubble_sort" to "selection_sort" or "insertion_sort" - which again runs smoothly without any problem.


The first impression of the Copilot is absolutely will be very helpful for speeding up a lot of well-established functions, and the impact of it will be more clear in the next few years. It is also worth noting that the suggested code with AI technique is not perfect, and it is the programmer's responsibility to check, use, or refine it for their needs.

How does GitHub Copilot work? 


OpenAI Codex was trained on publicly available source code and natural language, so it understands both programming and human languages. The GitHub Copilot editor extension sends your comments and code to the GitHub Copilot service, which then uses OpenAI Codex to synthesize and suggest individual lines and whole functions.


Does GitHub Copilot write perfect code? 


No. GitHub Copilot tries to understand your intent and to generate the best code it can, but the code it suggests may not always work, or even make sense. While we are working hard to make GitHub Copilot better, code suggested by GitHub Copilot should be carefully tested, reviewed, and vetted, like any other code. As the developer, you are always in charge.


Image manipulation in Python

Image manipulation in Python