In this post, we will introduce what is the OpenAPI code generator, and what it does in the context of the REST API and OpenAPI specification. Although I had a clear understanding of the REST API and why we need follow OpenAPI specification, it was not so clear at the beginning when it comes to the OpenAPI code generator and what it generates, and how it helps. If you have the same confusion, you are in the right place.
The content is as follows:
- Background
- Install OpenAPI code generator
- Prepare OpenAPI specification - YAML/JSON file
- Generate server stub using the OpenAPI code generator
- Implement your functionality on top of the generated server sub
Background
Before delving into OpenAPI code generator, let's first talk about some background of the OpenAPI specification first.
It comes from the API-first design or top-down API development where we specify API specifications first using formats such as OpenAPI specification, then implement the actual code. In contrast, the other option - code-first designs or bottom-up approach - implements the actual code and then generates API specifications from that.
So we are talking about the API-first design, which has following workflows:
OpenAPI specification document (JSON/YAML file) => OpenAPI code generator => Client/Server stubs (skeletons) => Implement your business logic code to complete the stubs
According to the Swagger website, the OpenAPI Specification (OAS) defines a standard, language-agnostic interface to HTTP APIs which allows both humans and computers to discover and understand the capabilities of the service without access to source code, documentation, or through network traffic inspection. When properly defined, a consumer can understand and interact with the remote service with a minimal amount of implementation logic.
Prepare OpenAPI specification - YAML/JSON file
An OpenAPI document that conforms to the OpenAPI Specification is itself a JSON object, which may be represented either in JSON or YAML format. You can use online tools such as Swagger editor to design and define your specification.
We use an example OpenAPI specification (an YAML file - openapi.yaml) from an awesome example. For detailed explanation regarding the specification, one can look at the example page.
openapi: 4.0.2
info:
  title: Sample OpenAPI Specification
  description: 'An OpenAPI specification example for Building API services: A Beginners Guide document.'
  version: 0.0.1
servers:
  - url: http://localhost:9000/
    description: Example API Service
components:
  schemas:
    'User':
      type: object
      required:
        - display_name
        - email
      properties:
        name:
          type: string
          readOnly: true
        display_name:
          type: string
          maxLength: 20
          minLength: 1
        email:
          type: string
          format: email
    'ErrorMessage':
      type: object
      required:
        - error_code
        - error_message
      properties:
        error_code:
          type: string
        error_message:
          type: string
paths:
  /users/{user_id}:
    parameters:
      - name: user_id
        in: path
        description: ID of a user
        required: true
        schema:
          type: string
    get:
      description: Gets a user
      operationId: get_user
      responses:
        '200':
          description: User found
          content:
            'application/json':
              schema:
                $ref: '#/components/schemas/User'
        'default':
          description: Unexpected error
          content:
            'application/json':
              schema:
                $ref: '#/components/schemas/ErrorMessage'
Install OpenAPI code generator
We can test if after installation:
$openapi-generator-cli version
7.2.0
Generate server stub using the OpenAPI code generator
Once we have an OpenAPI specification for your API design and the OpenAPI code generator ready, we can use the tool to generate clent SDK or server stubs in a lot of different programming languages. A complete list of generators provided by the tool can be found here.
Here we want to generate server stubs with the python-flask generator of the tool, which will help us generate server stubs according to the openapi.yaml file we have prepared.
openapi-generator-cli generate -i openapi.yaml -o generated -g python-flask
-i: the input file
-o: destination folder to generate all files
-g: specify generator - python-flask
Dockerfile
git_push.sh
/openapi_server
    /controllers
    /models
    /test
    /openapi
    encoder.py
    __init__.py
    __main__.py
    __pycache__
    typing_utils.py
    util.py
README.md
requirements.txt
setup.py
test-requirements.txt
tox.ini
Here we use Python version: 3.9.18 environment, and follow the README.md instruction. The first step is installing required packages specified in the requirements.txt.
pip3 install -r requirements.txt
But I found some parts need to be updated. For example, in the requirements.txt, we need to update the installation of connextion including the flask for the first line as the old Flask in the last line doesn't work for the new Python version.
  1 connexion[swagger-ui] >= 2.6.0; python_version>="3.6"
  2 # 2.3 is the last version that supports python 3.4-3.5
  3 connexion[swagger-ui] <= 2.3.0; python_version=="3.5" or python_version=="3.4"
  4 # connexion requires werkzeug but connexion < 2.4.0 does not install werkzeug
  5 # we must peg werkzeug versions below to fix connexion
  6 # https://github.com/zalando/connexion/pull/1044
  7 werkzeug == 0.16.1; python_version=="3.5" or python_version=="3.4"
  8 swagger-ui-bundle >= 0.0.2
  9 python_dateutil >= 2.6.0
 10 setuptools >= 21.0.0
 11 Flask == 2.1.1
  1 connexion[swagger-ui,flask] >= 2.6.0; python_version>="3.6"
  2 # 2.3 is the last version that supports python 3.4-3.5
  3 connexion[swagger-ui] <= 2.3.0; python_version=="3.5" or python_version=="3.4"
  4 # connexion requires werkzeug but connexion < 2.4.0 does not install werkzeug
  5 # we must peg werkzeug versions below to fix connexion
  6 # https://github.com/zalando/connexion/pull/1044
  7 werkzeug == 0.16.1; python_version=="3.5" or python_version=="3.4"
  8 swagger-ui-bundle >= 0.0.2
  9 python_dateutil >= 2.6.0
 10 setuptools >= 21.0.0
from json import JSONEncoder
from openapi_server.models.base_model import Model


class JSONEncoder(JSONEncoder):
    include_nulls = False

    def default(self, o):
        if isinstance(o, Model):
            dikt = {}
            for attr in o.openapi_types:
                value = getattr(o, attr)
                if value is None and not self.include_nulls:
                    continue
                attr = o.attribute_map[attr]
                dikt[attr] = value
            return dikt
        return JSONEncoder.default(self, o)
Once we've done the setting up of the required packages, we can start the API server according to the README.md file.
python3 -m openapi_server
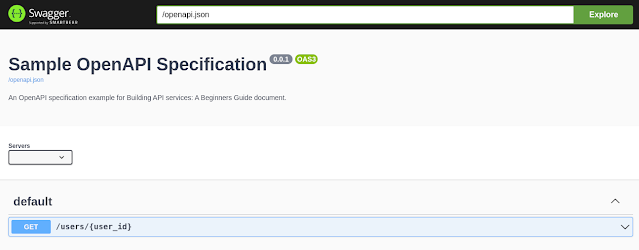
We can now access the UI http://127.0.0.1:8080/ui/ for an UI provided from Swagger about your REST API based on the specification.

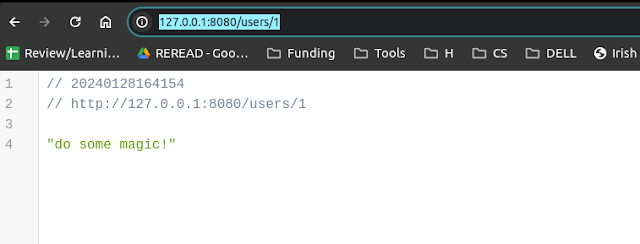
If we test it the API out using our path specified in our openapi.yaml, we can see the current autogenrated stub provides some dummy responses, and this part needs to be completed by us with our actual code and logic.

Implement your functionality on top of the generated server sub
As we mentioned ealier, you can find the default_controller.py file which shows your actual code and implemetation of your logic need to go based on the current stub that has been autogamically generated by the OpenAPI code generator.
def get_user(user_id):  # noqa: E501
    """get_user

    Gets a user # noqa: E501

    :param user_id: ID of a user
    :type user_id: str

    :rtype: Union[User, Tuple[User, int], Tuple[User, int, Dict[str, str]]
    """
    return 'do some magic!'
One thing to note is that the rtype (return type) is also very confusing here. It says Union or Tuple type but after many trials and errors, it turns out to be a JSON object - e.g., using json.dumps() - to be returned in order to work!
No comments:
Post a Comment