Showing posts with label API. Show all posts

How to use the OpenAPI code generator with your OpenAPI specification for your REST API implementation

In this post, we will introduce what is the OpenAPI code generator, and what it does in the context of the REST API and OpenAPI specification. Although I had a clear understanding of the REST API and why we need follow OpenAPI specification, it was not so clear at the beginning when it comes to the OpenAPI code generator and what it generates, and how it helps. If you have the same confusion, you are in the right place.

The content is as follows:
  • Background
  • Install OpenAPI code generator
  • Prepare OpenAPI specification - YAML/JSON file
  • Generate server stub using the OpenAPI code generator
  • Implement your functionality on top of the generated server sub

Background

Before delving into OpenAPI code generator, let's first talk about some background of the OpenAPI specification first. 

It comes from the API-first design or top-down API development where we specify API specifications first using formats such as OpenAPI specification, then implement the actual code. In contrast, the other option -  code-first designs or bottom-up approach - implements the actual code and then generates API specifications from that.

So we are talking about the API-first design, which has following workflows:
OpenAPI specification document (JSON/YAML file) => OpenAPI code generator => Client/Server stubs (skeletons) => Implement your business logic code to complete the stubs

According to the Swagger website, the OpenAPI Specification (OAS) defines a standard, language-agnostic interface to HTTP APIs which allows both humans and computers to discover and understand the capabilities of the service without access to source code, documentation, or through network traffic inspection. When properly defined, a consumer can understand and interact with the remote service with a minimal amount of implementation logic. 


Prepare OpenAPI specification - YAML/JSON file


An OpenAPI document that conforms to the OpenAPI Specification is itself a JSON object, which may be represented either in JSON or YAML format. You can use online tools such as Swagger editor to design and define your specification.

We use an example OpenAPI specification (an YAML file - openapi.yaml) from an awesome example. For detailed explanation regarding the specification, one can look at the example page.


openapi: 4.0.2
info:
  title: Sample OpenAPI Specification
  description: 'An OpenAPI specification example for Building API services: A Beginners Guide document.'
  version: 0.0.1
servers:
  - url: http://localhost:9000/
    description: Example API Service
components:
  schemas:
    'User':
      type: object
      required:
        - display_name
        - email
      properties:
        name:
          type: string
          readOnly: true
        display_name:
          type: string
          maxLength: 20
          minLength: 1
        email:
          type: string
          format: email
    'ErrorMessage':
      type: object
      required:
        - error_code
        - error_message
      properties:
        error_code:
          type: string
        error_message:
          type: string
paths:
  /users/{user_id}:
    parameters:
      - name: user_id
        in: path
        description: ID of a user
        required: true
        schema:
          type: string
    get:
      description: Gets a user
      operationId: get_user
      responses:
        '200':
          description: User found
          content:
            'application/json':
              schema:
                $ref: '#/components/schemas/User'
        'default':
          description: Unexpected error
          content:
            'application/json':
              schema:
                $ref: '#/components/schemas/ErrorMessage'

Install OpenAPI code generator

First, we need to get our OpenAPI code generator ready. We can follow the install OpenAPI code generator instruction from its official site, I used "Bash Launcher Script" for my installation on Ubuntu22.04. 

We can test if after installation:

$openapi-generator-cli version
7.2.0


Generate server stub using the OpenAPI code generator

Once we have an OpenAPI specification for your API design and the OpenAPI code generator ready, we can use the tool to generate clent SDK or server stubs in a lot of different programming languages. A complete list of generators provided by the tool can be found here.

Here we want to generate server stubs with the python-flask generator of the tool, which will help us generate server stubs according to the openapi.yaml file we have prepared.
 

openapi-generator-cli generate -i openapi.yaml -o generated -g python-flask
-i: the input file
-o: destination folder to generate all files
-g: specify generator - python-flask


Under the generated folder, we can see the following folder structure with all folders and files generated automatically.

Dockerfile  
git_push.sh  
/openapi_server 
    /controllers
    /models
    /test
    /openapi
    encoder.py  
    __init__.py  
    __main__.py  
    __pycache__    
    typing_utils.py  
    util.py
README.md  
requirements.txt  
setup.py  
test-requirements.txt  
tox.ini
The README.md file contains instructions about how to set up the API server. The model folder contains the model - user resource - of the API defined, and the controllers folder contains files related to API logic. 

Here we use Python version: 3.9.18 environment, and follow the README.md instruction. The first step is installing required packages specified in the requirements.txt.

pip3 install -r requirements.txt
But I found some parts need to be updated. For example, in the requirements.txt, we need to update the installation of connextion including the flask for the first line as the old Flask in the last line doesn't work for the new Python version.

  1 connexion[swagger-ui] >= 2.6.0; python_version>="3.6"
  2 # 2.3 is the last version that supports python 3.4-3.5
  3 connexion[swagger-ui] <= 2.3.0; python_version=="3.5" or python_version=="3.4"
  4 # connexion requires werkzeug but connexion < 2.4.0 does not install werkzeug
  5 # we must peg werkzeug versions below to fix connexion
  6 # https://github.com/zalando/connexion/pull/1044
  7 werkzeug == 0.16.1; python_version=="3.5" or python_version=="3.4"
  8 swagger-ui-bundle >= 0.0.2
  9 python_dateutil >= 2.6.0
 10 setuptools >= 21.0.0
 11 Flask == 2.1.1


  1 connexion[swagger-ui,flask] >= 2.6.0; python_version>="3.6"
  2 # 2.3 is the last version that supports python 3.4-3.5
  3 connexion[swagger-ui] <= 2.3.0; python_version=="3.5" or python_version=="3.4"
  4 # connexion requires werkzeug but connexion < 2.4.0 does not install werkzeug
  5 # we must peg werkzeug versions below to fix connexion
  6 # https://github.com/zalando/connexion/pull/1044
  7 werkzeug == 0.16.1; python_version=="3.5" or python_version=="3.4"
  8 swagger-ui-bundle >= 0.0.2
  9 python_dateutil >= 2.6.0
 10 setuptools >= 21.0.0

Also, the encoder.py file needs to be updated using JSONEncoder from the json package instead of FlaskJSONEncoder as it was automatically generated.

from json import JSONEncoder
from openapi_server.models.base_model import Model


class JSONEncoder(JSONEncoder):
    include_nulls = False

    def default(self, o): 
        if isinstance(o, Model):
            dikt = {}
            for attr in o.openapi_types:
                value = getattr(o, attr)
                if value is None and not self.include_nulls:
                    continue
                attr = o.attribute_map[attr]
                dikt[attr] = value
            return dikt
        return JSONEncoder.default(self, o)

There is seprate port issue reported on GitHub about the port specified in the OpenAPI specification is not reflected in the generated code. For example, the server still start at 8080 no matter which port you have specified in the OpenAPI specification (YAML/JSON file).

Once we've done the setting up of the required packages, we can start the API server according to the README.md file.


python3 -m openapi_server


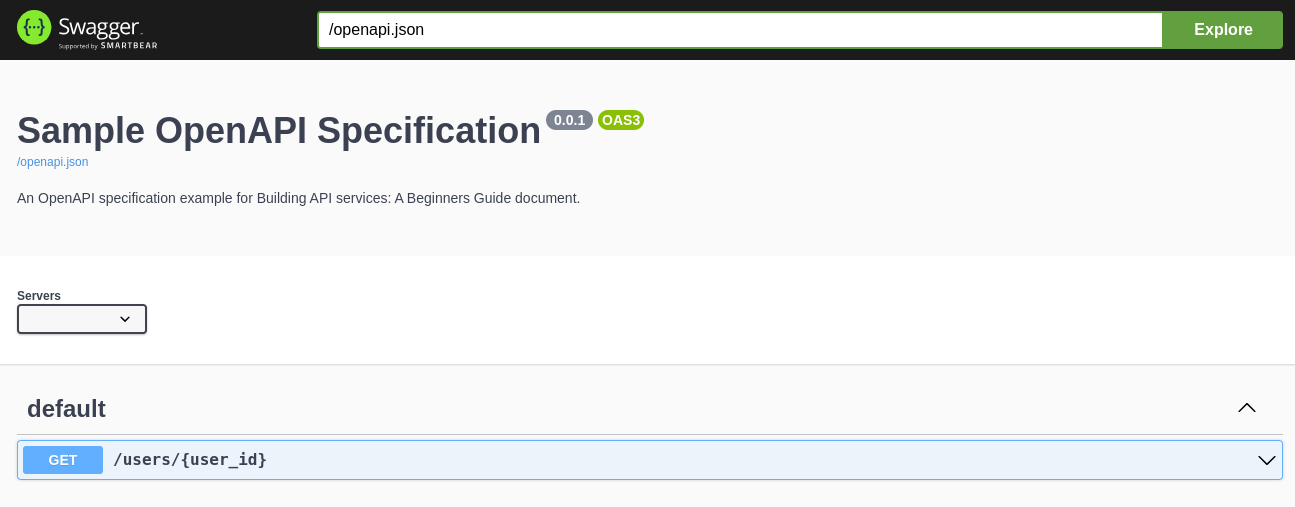
We can now access the UI http://127.0.0.1:8080/ui/ for an UI provided from Swagger about your REST API based on the specification.


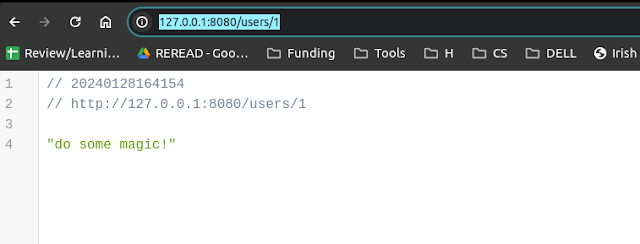
If we test it the API out using our path specified in our openapi.yaml, we can see the current autogenrated stub provides some dummy responses, and this part needs to be completed by us with our actual code and logic.


Implement your functionality on top of the generated server sub

As we mentioned ealier, you can find the default_controller.py file which shows your actual code and implemetation of your logic need to go based on the current stub that has been autogamically generated by the OpenAPI code generator.


def get_user(user_id):  # noqa: E501
    """get_user

    Gets a user # noqa: E501

    :param user_id: ID of a user
    :type user_id: str

    :rtype: Union[User, Tuple[User, int], Tuple[User, int, Dict[str, str]]
    """
    return 'do some magic!'

One thing to note is that the rtype (return type) is also very confusing here. It says Union or Tuple type but after many trials and errors, it turns out to be a JSON object - e.g., using json.dumps() - to be returned in order to work!

I hope you enjoyed the post and it is helpful for your REST API development journey!

GooglePlus API Internal Server Error 500

I use Google+ Java API to get activities of a user and got the error sometimes.

In order to check if it is code problem, checked through API explorer and also has the same problem.

Finally check on the user's profile, the same 500 error occurs while clicking "more" in user's Google+ page.

It seems Google's server problem..

Social Network API Test


  • What can obtain from Graph API in Facebook? (Assume user is not using my app)
    1. Search by name: https://graph.facebook.com/v2.2/search?q=Guangyuan+Piao&type=user&access_token="your access token"
    2. Get name, id
    3. Search user information by id: https://graph.facebook.com/v2.2/id
    4. Get id, first_name, last_name, link, name, updated_time

  • Limit on Google Plus API?
    1. per day (10,000) and per second (5)

  • Limit on Twitter API?
    1. user look up 180/time_window (15min in v.1.1)
    2. get user timeline 180/time_window (15min in v.1.1)
    3. How to get user timeline with paging?
- The example below get 100 statuses / page for 10 times (for loop) to get maximum 1000 tweets from user timeline.
- However, because every call for getUserTimeline() will use one rate, it is better to check the status list and break the look if there's no more status in the current page....

1:  for (int j=1; j<11; j++) {  
2:        Paging page = new Paging (j, 100); // page number, number per page  
3:        List<Status> statuses = twitter.getUserTimeline(user.getId(), page); // rate will for -1 each call  
4:       if (statuses.size() < 1) {  
5:              break;  
6:       }   
7:  }  


  • Twitter Helper 


1:    TwitterFactory factory;  
2:    Twitter twitter;  
3:       public TwitterHelper() {  
4:            // Configuration of Twitter API  
5:            ConfigurationBuilder cb = new ConfigurationBuilder();  
6:       cb.setDebugEnabled(false)  
7:        .setOAuthConsumerKey(consumerKey)  
8:        .setOAuthConsumerSecret(consumerSecret)  
9:        .setOAuthAccessToken(accessToken)  
10:        .setOAuthAccessTokenSecret(accessSecret);  
11:      // Initialize Twitter Instance  
12:      factory = new TwitterFactory(cb.build());  
13:      twitter = factory.getInstance();  
14:       }  
15:       public int getStatusesRemainingRate() {  // check /statuses/user_timeline endpoint remaining rate

16:            int i = 0;  
17:            RateLimitStatus status;  
18:            try {  
19:                 status = twitter.getRateLimitStatus().get("/statuses/user_timeline");  
20:                 i = status.getRemaining();  
21:            } catch (TwitterException e) {  
22:                 System.out.println(e.getMessage());  
23:            }  
24:            return i;  
25:       }  

Google Custom Search Engine API - lowRange, highRange, startNum

In line #2, with parameter "highRange":"19800","inputEncoding":"utf8","lowRange":"19700" get total 3 search results with the custom engine.

But in line #50, with parameter "highRange":"19900","inputEncoding":"utf8","lowRange":"19800" get total 0 search results....

And again in line #103, with parameter "highRange":"20000","inputEncoding":"utf8","lowRange":"19900" get total 4840 results...


What is the lowRange and highRange exactly???

highRangestring
  • Specifies the ending value for a search range.
  • Use lowRange and highRange to append an inclusive search range of lowRange...highRange  to the query.
One  of the most relevant answer in Google group is: 

-------------------------------
In my opinion you could get all the results using the lowRange and High Range properties of the query, and putting values higher than 100
I am using the .net interface and it would look like that:

 CustomsearchService svc = new CustomsearchService();
                    svc.Key = apiKey;
                    
                    Google.Apis.Customsearch.v1.CseResource.ListRequest listRequest = svc.Cse.List(query);
                    listRequest.Cx = cx;
                    
                    listRequest.Start = 0; 
                    listRequest.Num = 10; 
                    listRequest.LowRange = "100";
                    listRequest.HighRange = "200";
                    Google.Apis.Customsearch.v1.Data.Search search = listRequest.Fetch();

                    foreach (Google.Apis.Customsearch.v1.Data.Result result in search.Items)
                    {
                        Console.WriteLine("Title: {0}", result.Title);
                        Console.WriteLine("Link: {0}", result.Link);
                    }
----------------------------------------


But it doesn't make sense in this experiments.... or maybe due to the different search engine mirror used in my case...

1:  results searchinfo:{"formattedSearchTime":"0.41","formattedTotalResults":"3","searchTime":0.409284,"totalResults":"3"}  
2:  results getQuery:{request=[{"count":3,"cx":"008378975908491122506:kjiqkuune8u","highRange":"19800","inputEncoding":"utf8","lowRange":"19700","outputEncoding":"utf8","safe":"off","searchTerms":"linkedin.com/in coursera","siteSearch":"http://www.linkedin.com/in/","startIndex":1,"title":"Google Custom Search - linkedin.com/in coursera","totalResults":"3"}]}  
3:  result size3  
4:  Nick Hall | <b>LinkedIn</b>  
5:  https://www.linkedin.com/in/cloggin  
6:  -----------------------  
7:  Ben Cairns - MEng | <b>LinkedIn</b>  
8:  www.linkedin.com/in/bencairns  
9:  -----------------------  
10:  Sirron Carrector | <b>LinkedIn</b>  
11:  https://www.linkedin.com/in/sirroncarrector  
12:  -----------------------  
13:  starting from...1  
14:  Dec 01, 2014 3:19:03 PM com.google.api.client.googleapis.services.AbstractGoogleClient <init>  
15:  WARNING: Application name is not set. Call Builder#setApplicationName.  
16:  results searchinfo:{"formattedSearchTime":"0.50","formattedTotalResults":"0","searchTime":0.502496,"totalResults":"0"}  
17:  Dec 01, 2014 3:19:04 PM com.google.api.client.googleapis.services.AbstractGoogleClient <init>  
18:  WARNING: Application name is not set. Call Builder#setApplicationName.  
19:  results getQuery:{request=[{"count":10,"cx":"008378975908491122506:kjiqkuune8u","highRange":"19900","inputEncoding":"utf8","lowRange":"19800","outputEncoding":"utf8","safe":"off","searchTerms":"linkedin.com/in coursera","siteSearch":"http://www.linkedin.com/in/","startIndex":1,"title":"Google Custom Search - linkedin.com/in coursera","totalResults":"0"}]}  
20:  starting from...11  
21:  results searchinfo:{"formattedSearchTime":"0.51","formattedTotalResults":"0","searchTime":0.509313,"totalResults":"0"}  
22:  results getQuery:{request=[{"count":10,"cx":"008378975908491122506:kjiqkuune8u","highRange":"19900","inputEncoding":"utf8","lowRange":"19800","outputEncoding":"utf8","safe":"off","searchTerms":"linkedin.com/in coursera","siteSearch":"http://www.linkedin.com/in/","startIndex":11,"title":"Google Custom Search - linkedin.com/in coursera","totalResults":"0"}]}  
23:  starting from...21  
24:  Dec 01, 2014 3:19:05 PM com.google.api.client.googleapis.services.AbstractGoogleClient <init>  
25:  WARNING: Application name is not set. Call Builder#setApplicationName.  
26:  com.google.api.client.googleapis.json.GoogleJsonResponseException: 500 Internal Server Error  
27:  {  
28:   "code" : 500,  
29:   "errors" : [ {  
30:    "domain" : "global",  
31:    "message" : "Backend Error",  
32:    "reason" : "backendError"  
33:   } ],  
34:   "message" : "Backend Error"  
35:  }  
36:  starting from...31  
37:       at com.google.api.client.googleapis.json.GoogleJsonResponseException.from(GoogleJsonResponseException.java:145)  
38:       at com.google.api.client.googleapis.services.json.AbstractGoogleJsonClientRequest.newExceptionOnError(AbstractGoogleJsonClientRequest.java:113)  
39:       at com.google.api.client.googleapis.services.json.AbstractGoogleJsonClientRequest.newExceptionOnError(AbstractGoogleJsonClientRequest.java:40)  
40:       at com.google.api.client.googleapis.services.AbstractGoogleClientRequest$1.interceptResponse(AbstractGoogleClientRequest.java:312)  
41:       at com.google.api.client.http.HttpRequest.execute(HttpRequest.java:1049)  
42:       at com.google.api.client.googleapis.services.AbstractGoogleClientRequest.executeUnparsed(AbstractGoogleClientRequest.java:410)  
43:       at com.google.api.client.googleapis.services.AbstractGoogleClientRequest.executeUnparsed(AbstractGoogleClientRequest.java:343)  
44:       at com.google.api.client.googleapis.services.AbstractGoogleClientRequest.execute(AbstractGoogleClientRequest.java:460)  
45:       at parklize.blogspot.com.test.GoogleSearchClient.getSearchResult(GoogleSearchClient.java:55)  
46:       at parklize.blogspot.com.test.GoogleSearchClient.main(GoogleSearchClient.java:101)  
47:  Dec 01, 2014 3:19:10 PM com.google.api.client.googleapis.services.AbstractGoogleClient <init>  
48:  WARNING: Application name is not set. Call Builder#setApplicationName.  
49:  results searchinfo:{"formattedSearchTime":"4.87","formattedTotalResults":"0","searchTime":4.868337,"totalResults":"0"}  
50:  results getQuery:{request=[{"count":10,"cx":"008378975908491122506:kjiqkuune8u","highRange":"19900","inputEncoding":"utf8","lowRange":"19800","outputEncoding":"utf8","safe":"off","searchTerms":"linkedin.com/in coursera","siteSearch":"http://www.linkedin.com/in/","startIndex":31,"title":"Google Custom Search - linkedin.com/in coursera","totalResults":"0"}]}  
51:  starting from...41  
52:  Dec 01, 2014 3:19:15 PM com.google.api.client.googleapis.services.AbstractGoogleClient <init>  
53:  WARNING: Application name is not set. Call Builder#setApplicationName.  
54:  results searchinfo:{"formattedSearchTime":"0.65","formattedTotalResults":"0","searchTime":0.645973,"totalResults":"0"}  
55:  Dec 01, 2014 3:19:16 PM com.google.api.client.googleapis.services.AbstractGoogleClient <init>  
56:  WARNING: Application name is not set. Call Builder#setApplicationName.  
57:  results getQuery:{request=[{"count":10,"cx":"008378975908491122506:kjiqkuune8u","highRange":"19900","inputEncoding":"utf8","lowRange":"19800","outputEncoding":"utf8","safe":"off","searchTerms":"linkedin.com/in coursera","siteSearch":"http://www.linkedin.com/in/","startIndex":41,"title":"Google Custom Search - linkedin.com/in coursera","totalResults":"0"}]}  
58:  starting from...51  
59:  results searchinfo:{"formattedSearchTime":"0.70","formattedTotalResults":"0","searchTime":0.704197,"totalResults":"0"}  
60:  Dec 01, 2014 3:19:18 PM com.google.api.client.googleapis.services.AbstractGoogleClient <init>  
61:  WARNING: Application name is not set. Call Builder#setApplicationName.  
62:  results getQuery:{request=[{"count":10,"cx":"008378975908491122506:kjiqkuune8u","highRange":"19900","inputEncoding":"utf8","lowRange":"19800","outputEncoding":"utf8","safe":"off","searchTerms":"linkedin.com/in coursera","siteSearch":"http://www.linkedin.com/in/","startIndex":51,"title":"Google Custom Search - linkedin.com/in coursera","totalResults":"0"}]}  
63:  starting from...61  
64:  com.google.api.client.googleapis.json.GoogleJsonResponseException: 500 Internal Server Error  
65:  {  
66:   "code" : 500,  
67:   "errors" : [ {  
68:    "domain" : "global",  
69:    "message" : "Backend Error",  
70:    "reason" : "backendError"  
71:   } ],  
72:   "message" : "Backend Error"  
73:  }  
74:  starting from...71  
75:       at com.google.api.client.googleapis.json.GoogleJsonResponseException.from(GoogleJsonResponseException.java:145)  
76:       at com.google.api.client.googleapis.services.json.AbstractGoogleJsonClientRequest.newExceptionOnError(AbstractGoogleJsonClientRequest.java:113)  
77:       at com.google.api.client.googleapis.services.json.AbstractGoogleJsonClientRequest.newExceptionOnError(AbstractGoogleJsonClientRequest.java:40)  
78:       at com.google.api.client.googleapis.services.AbstractGoogleClientRequest$1.interceptResponse(AbstractGoogleClientRequest.java:312)  
79:       at com.google.api.client.http.HttpRequest.execute(HttpRequest.java:1049)  
80:       at com.google.api.client.googleapis.services.AbstractGoogleClientRequest.executeUnparsed(AbstractGoogleClientRequest.java:410)  
81:       at com.google.api.client.googleapis.services.AbstractGoogleClientRequest.executeUnparsed(AbstractGoogleClientRequest.java:343)  
82:       at com.google.api.client.googleapis.services.AbstractGoogleClientRequest.execute(AbstractGoogleClientRequest.java:460)  
83:       at parklize.blogspot.com.test.GoogleSearchClient.getSearchResult(GoogleSearchClient.java:55)  
84:       at parklize.blogspot.com.test.GoogleSearchClient.main(GoogleSearchClient.java:101)  
85:  Dec 01, 2014 3:19:23 PM com.google.api.client.googleapis.services.AbstractGoogleClient <init>  
86:  WARNING: Application name is not set. Call Builder#setApplicationName.  
87:  results searchinfo:{"formattedSearchTime":"3.40","formattedTotalResults":"0","searchTime":3.402622,"totalResults":"0"}  
88:  results getQuery:{request=[{"count":10,"cx":"008378975908491122506:kjiqkuune8u","highRange":"19900","inputEncoding":"utf8","lowRange":"19800","outputEncoding":"utf8","safe":"off","searchTerms":"linkedin.com/in coursera","siteSearch":"http://www.linkedin.com/in/","startIndex":71,"title":"Google Custom Search - linkedin.com/in coursera","totalResults":"0"}]}  
89:  starting from...81  
90:  Dec 01, 2014 3:19:27 PM com.google.api.client.googleapis.services.AbstractGoogleClient <init>  
91:  WARNING: Application name is not set. Call Builder#setApplicationName.  
92:  results searchinfo:{"formattedSearchTime":"0.72","formattedTotalResults":"0","searchTime":0.722594,"totalResults":"0"}  
93:  results getQuery:{request=[{"count":10,"cx":"008378975908491122506:kjiqkuune8u","highRange":"19900","inputEncoding":"utf8","lowRange":"19800","outputEncoding":"utf8","safe":"off","searchTerms":"linkedin.com/in coursera","siteSearch":"http://www.linkedin.com/in/","startIndex":81,"title":"Google Custom Search - linkedin.com/in coursera","totalResults":"0"}]}  
94:  starting from...91  
95:  Dec 01, 2014 3:19:28 PM com.google.api.client.googleapis.services.AbstractGoogleClient <init>  
96:  WARNING: Application name is not set. Call Builder#setApplicationName.  
97:  results searchinfo:{"formattedSearchTime":"0.56","formattedTotalResults":"0","searchTime":0.558098,"totalResults":"0"}  
98:  results getQuery:{request=[{"count":10,"cx":"008378975908491122506:kjiqkuune8u","highRange":"19900","inputEncoding":"utf8","lowRange":"19800","outputEncoding":"utf8","safe":"off","searchTerms":"linkedin.com/in coursera","siteSearch":"http://www.linkedin.com/in/","startIndex":91,"title":"Google Custom Search - linkedin.com/in coursera","totalResults":"0"}]}  
99:  starting from...1  
100:  Dec 01, 2014 3:19:28 PM com.google.api.client.googleapis.services.AbstractGoogleClient <init>  
101:  WARNING: Application name is not set. Call Builder#setApplicationName.  
102:  results searchinfo:{"formattedSearchTime":"0.34","formattedTotalResults":"4,840","searchTime":0.336376,"totalResults":"4840"}  
103:  results getQuery:{nextPage=[{"count":10,"cx":"008378975908491122506:kjiqkuune8u","highRange":"20000","inputEncoding":"utf8","lowRange":"19900","outputEncoding":"utf8","safe":"off","searchTerms":"linkedin.com/in coursera","siteSearch":"http://www.linkedin.com/in/","startIndex":11,"title":"Google Custom Search - linkedin.com/in coursera","totalResults":"4840"}], request=[{"count":10,"cx":"008378975908491122506:kjiqkuune8u","highRange":"20000","inputEncoding":"utf8","lowRange":"19900","outputEncoding":"utf8","safe":"off","searchTerms":"linkedin.com/in coursera","siteSearch":"http://www.linkedin.com/in/","startIndex":1,"title":"Google Custom Search - linkedin.com/in coursera","totalResults":"4840"}]}  
104:  result size10  

3 steps to add API doc to NetBeans

  • In NetBeans(8.0 in this post), select [Tools] -> [Libraries]


  • [New Library] and add related jars to your library


  • That's it! Now add the created Library to your classpath and check API docs while programming!


RDFa Parsing for Website (using Semargl API)

1. Create Maven Project

2.Add Semargl dependencies (Refer to Semargl website for details)


3.Test for your website. (Change "http://localhost:8888/WiseWord/index.php" to your URL)

1:  public class Tester {  
2:    public static void main (String[] args) throws ParseException{  
3:    CharOutputSink outputSink = new CharOutputSink();  
4:    StreamProcessor sp = new StreamProcessor(  
5:    RdfaParser.connect(TurtleSerializer.connect(outputSink)));  
6:    outputSink.connect(System.out);  
7:    sp.process("http://localhost:8888/WiseWord/index.php");  
8:    }  
9:  }  

Use PHP Twitter API with twitteroauth library

The PHP example for accessing Twitter API resource - statuses/mentions_timeline with twitteroauth PHP library. Suppose you've already registered as a developer in Twitter and created app and got the four things for the example.

1.API key
2.API secret
3.Access token
4.Access token Secret


Step 1. Download the twitteroauth including "oauth.php", "twitteroauth.php", "config.php" from twitteroauth github.

Step 2. Modify CONSUMER_KEY and CONSUMER_SECRET with your API key and API secret in "config.php".


Step 3. Try the code below to call resource - statuses/home_timeline with your Access token and Access token Secret.